Tips to test (end to end) library changes - Gradle based Project

The Problem
I had made multiple changes in 2 dependencies of the spring application. These changes are on the local machine, and I need to test the functionality of the change end to end with the dependent application before pushing the artifact to a remote artifact repository like Artifactory.
I know this is a simple task, but the reason is that some people are still struggling with this thing (including me), and now even popular IDE like IntelliJ also support that. But, which approach to choose is still people get confused.
Setup
Here, I am using Kotlin, Gradle, and IntelliJ development IDE. For the sake of simplicity, I am going to use a simple project, but the challenges are still the same.
 Let’s start
I ask about above problem every time to myself, whenever I am working on a project that has some changes in one of the dependencies, and I know there are many ways to handle it. Let’s see some of them.
Approach 1: Upload the changes to a remote artifact repository (Artifactory) and use that to test
This is straightforward. Here, we simply publish our change to remote Artifactory and update the version of the dependency in build.gradle file,
For example,
1
2
-implementation("dev.pravin:projectb:1.0.1")
+implementation("dev.pravin:projectb:1.0.2")
I do not suggest this approach. If you are unsure about your change, it is better to avoid this approach. You could follow either of the below approaches to test locally. Later go ahead and follow this approach. Mostly this is taken care of by CI build pipeline.
Other things to know:
- Once the build is available in remote Artifactory, we have to update the library version in the
build.gradlefile and use that to test the changes. - It takes a lot of time as now we have to update the build version push those changes to the version control system (GitHub, Bitbucket, etc.), create a new build with CI pipeline, and later push it to Artifactory. Update the
build.gradlefile in the dependent app to test it. As we add changes, we have to follow the same steps again. - It is easy to accomplish.
- The artifact repository becomes messy as there is no way to tell stable and unstable build.
- It creates more confusion for other folks who will be using it.

Approach 2: Add changes as external jar dependency
It is another way to add a dependency to the project, but it requires a few extra steps to configure the dependency. If you update the dependency, you need to remove the older one, then add the latest one.
These steps keep repeating for each change.
 steps to add external jar
Other things to know:
- We have to uncomment the current dependency for the
build.gradlefile and import the jar as an external dependency. - We must create a jar of the library, and later follow steps to manually remove the old and add the updated jar.
- This approach can be frustrating if you have to test changes multiple times for the same library.
- It is easy to recall those steps, and anyone can easily do it.

Approach 3: publish changes to the local maven repository(~/.m2) and using that to test changes
Let’s say, Project A dependents on Project B.
Changes in Project B (Assuming Project B already has required changes):
Open the
build.gradlefile and add the following changes:
Increment project version
We can locally use it to identify artifacts by incrementing the version (like from 1.0.1 to 1.0.2).Add maven-publish plugin
1
2
3
4
5
  plugins {
      ...
      id "maven-publish"
  }
  ..
Add below config for publishing
1
2
3
4
5
6
7
8
  ...
  publishing {
      publications {
          maven(MavenPublication) {
              from components.java
          }
      }
  }
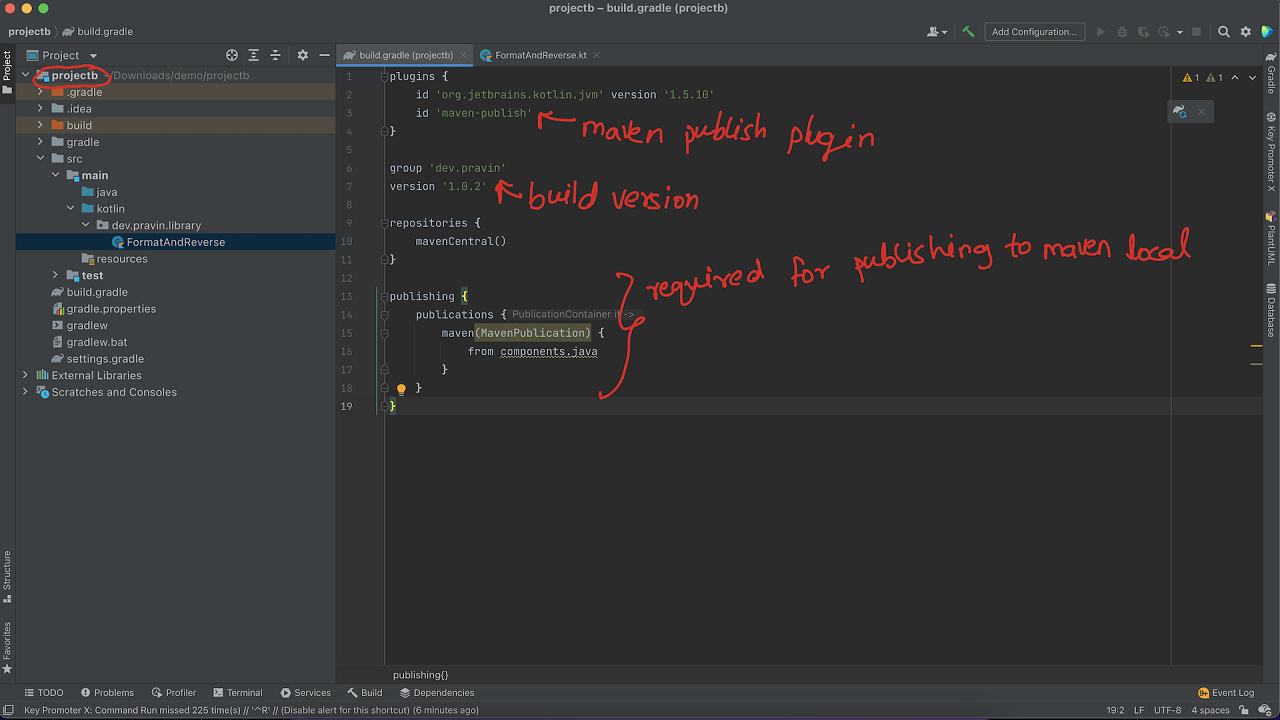 Screenshot of build.gradle in project B
open the terminal in the root folder of the project and run
gradle publishToMavenLocal.
This command, creates a new build of the project with the updated version, and publishes the jar artifact in the local repository of the maven.
This repository is used by other projects to resolve the dependency. Screenshot of terminal in project B
Changes in Project A:
we have to make small changes in
build.gradlefile.
check forrepositoriesand add “mavenLocal()” as the first entry.
Next, we must update the dependency version to the one we published in the previous step.1 2
- implementation("dev.pravin:projectb:1.0.1") + implementation("dev.pravin:projectb:1.0.2") Screenshot of build.gradle in project A
Reload the
build.gradlechanges and run the project.
This time Gradle will check the maven local repository (~/.m2) and use that to resolve dependencies. We should now be able to run the application with the latest changes. Screenshot of project A execution output
Here is the complete step animation:
 complete steps for both project changes
It is much simpler and avoids unnecessary artifact upload to a remote artifact repository for each change.
Other things to know:
- It has some code changes like adding the maven Local plugin, updating the version, and config related to publishing to maven local in
build.gradleof the application. - It comparatively takes less time, and it will be simple as we make changes.
We can reuse the same version while publishing to maven local. In the end, add code changes, publish to maven local with the same version, and reloadbuild.gradlein the dependent application. - There are small code changes, and it is easy to follow.

Approach 4: Add the library as a Module dependency in the application and test it
This pattern is followed by most Gradle projects where we add projects (Project A, Project B) as a subproject in the multi-project setup. We have to create top-level settings.gradle which has details of both subprojects.
In our problem, this method doesn’t provide much benefit as it requires more changes in gradle files to test the code changes. It feels like using a bazooka to kill a fly.
For step-by-step details, follow this link
Other things to know:
- We have to make a few changes in the Gradle file (
build.gradleandsettings.gradle) to achieve this. - It takes time to set up for beginners, and even for non-beginner, it still requires following some documentation (In short, it requires effort to remember steps).
- Understanding how this works takes some time.
- It is done as a one-time setup. Due to more steps involved if wrongly followed, it may cause other problems like dependency not being visible, and there could be more.
- It is not simple, and checking changes with more applications could be time-consuming.

Conclusion
After going through all the above approaches, it is clear that Approaches 1 and 4 are not a good choice. Both approaches 2 and 3 are better for this problem statement.
If there are small changes that we need to test, we can go with Approach 2, and it is ok as that involves fewer gradle file changes compared to approach 3.
If there are many changes that you need to test, it would be better to go with Approach 3. Even though approach 3 has few extra changes compared to approach 2, we know that there is a good possibility that we again have to make changes and redo the same process. So, approach 3 reduces the hassle of manual importing that approach 2 does.
For this problem statement, approach 3 is the better option as I need to make further changes and update the code.
You have something to share, go ahead and add in comments 😉 » Happy Learning!!